A Legacy of Love, Layered in Citrus and Sweetness
Some stories are so profoundly touching they weave their way into the very fabric of our lives, inspiring us to create something beautiful. This is the tale behind our exquisite `orange chiffon cake orange filling meringue` recipe – a dessert born from the enduring love of Evan and Bethel, a couple who have shared 71 years of marriage. At 95 and 92, respectively, their bond in a Stillwater, OK nursing home captivated a reader named Allee, whose heartfelt email sparked the creation of this very recipe.
Their story is a testament to unwavering devotion, a daily reminder that true love only deepens with time. Much like their relationship, this cake is built on layers: soft, airy, and full of vibrant zest, promising a delightful experience that lingers long after the last bite. It’s more than just a cake; it’s a celebration of timeless connection, a sweet tribute to a lifetime of shared moments, designed to bring joy and warmth with every forkful.
Crafting the Heart of the Cake: Zesty Orange Filling
The journey to this magnificent dessert begins with its vibrant heart: a luscious, zesty orange filling. This isn't just any custard; it's a burst of fresh citrus that perfectly balances the sweetness of the chiffon cake and meringue.
The Art of the Citrus Custard
Creating this filling is a delicate dance of flavors and temperatures. In a medium saucepan, you'll begin by whisking together granulated sugar, cornstarch, and a pinch of salt. Cornstarch is key here, acting as a thickening agent that ensures a smooth, stable custard. To this dry mixture, you'll stir in fresh orange zest, freshly squeezed orange juice, and a touch of lemon juice. The lemon isn't just for tartness; it brightens the orange flavor, making it pop even more.
Bring this mixture to a boil over medium heat, stirring frequently. It needs to boil for about one minute to activate the cornstarch fully. While this is happening, prepare your egg mixture: whisk together egg yolks and a whole egg until they are thoroughly blended. This combination of yolks and whole eggs provides richness and further stability to the custard.
The next critical step is tempering the eggs. Slowly pour about ¼ cup of the hot orange juice mixture over the eggs while whisking continuously. This gradually raises the temperature of the eggs, preventing them from scrambling when they hit the hotter pan. Once incorporated, remove the saucepan from the heat and, while stirring the mixture in the saucepan, slowly pour the tempered egg mixture back into it. Return the saucepan to medium-low heat and cook, stirring constantly, until the filling thickens beautifully – typically about four minutes.
Perfecting and Chilling Your Filling
Once thickened, remove the filling from the heat and stir in a generous knob of butter. The butter adds a luxurious silkiness and a beautiful sheen. Pour the hot filling into a bowl, then immediately cover it with plastic wrap, pressing the wrap directly against the surface of the filling. This crucial step prevents a skin from forming as it cools. Chill the filling for at least two hours; this allows it to set completely, ensuring it’s the perfect consistency for layering. When properly chilled, this `orange filling` offers a refreshing tang that cuts through the richness of the cake.
The Secret to Heavenly Fluffiness: Orange Chiffon Layers
The chiffon cake itself is a marvel of baking science, known for its incredibly light, airy texture that somehow manages to be both rich and delicate. Unlike traditional butter cakes, chiffon relies on oil for moisture and separated eggs for its signature fluff. For those looking to dive deeper into the nuances of achieving that perfect airy texture, explore our guide on
How to Bake a Fluffy Orange Chiffon Cake with Zesty Filling.
Mastering the Chiffon Batter
Preheat your oven to 350 degrees F (175 degrees C). Prepare three 9-inch round cake pans by buttering and flouring them meticulously. This ensures your delicate cakes release easily.
In the bowl of an electric stand mixer fitted with a paddle attachment, combine the dry ingredients: 1 1/3 cups granulated sugar, baking powder, and salt. Sift cake flour directly into the bowl. Sifting is essential for chiffon cake as it aerates the flour, contributing to that desired light texture.
Next, pour in the wet ingredients: canola oil, egg yolks (reserved from the egg whites you’ll use later), and orange juice. Blend this mixture on medium-high speed for 3-4 minutes, occasionally scraping down the sides and bottom of the bowl, until it's smooth and well-combined. Finally, blend in orange zest and a splash of vanilla extract for an added aromatic layer.
The Magic of Whipped Egg Whites
The true magic of chiffon cake lies in the expertly whipped egg whites. In a large, impeccably clean mixing bowl, using an electric hand mixer, whip the five reserved egg whites with ½ teaspoon of cream of tartar on moderately high speed. Cream of tartar acts as a stabilizer, helping the egg whites achieve and hold stiff peaks. Continue whipping until stiff, glossy peaks form – meaning when you lift the beaters, the peaks hold their shape and don't collapse.
Gently fold half of the whipped egg whites into your cake batter until partially combined. Then, add the remaining half and fold just until combined. *Overmixing at this stage is the enemy of fluffiness!* You want to preserve as much air as possible. Divide the batter evenly among your prepared baking pans and bake in the preheated oven for 17-19 minutes, or until a toothpick inserted into the center comes out clean.
Allow the cakes to cool in their pans for 10 minutes before inverting them onto wire racks to cool completely. This gradual cooling prevents the cakes from sinking and ensures they are firm enough to handle.
The Cloud-Like Crown: Perfect Toasted Meringue
The final touch, and arguably the most visually stunning, is the delicate, sweet meringue that crowns our `orange chiffon cake`. We opt for a Swiss meringue, known for its stability and silky texture.
Creating the Swiss Meringue
In a very clean, heatproof bowl (ensure no grease whatsoever, as it can prevent egg whites from whipping), combine six egg whites and granulated sugar. Set this bowl over a saucepan of barely simmering water, ensuring the bottom of the bowl does not touch the water. Heat the mixture, stirring constantly, until it registers 160 degrees F (71 degrees C) on a candy thermometer. This heating process both dissolves the sugar thoroughly and pasteurizes the egg whites, making the meringue safe to eat.
Remove the bowl from the saucepan, add ¼ teaspoon of cream of tartar (another stabilizer), and beat the mixture with an electric stand mixer on medium-high speed. Continue beating for 7-9 minutes, or until stiff, glossy peaks form. The meringue should be thick, voluminous, and hold its shape beautifully.
The Golden Finish
Once the meringue is whipped to perfection, it's ready to be spread over your assembled cake. For that iconic, irresistible finish, use a culinary torch to toast the meringue until it achieves a beautiful golden-brown hue. This not only adds a stunning visual appeal but also caramelizes the sugars, enhancing the flavor with subtle toasted notes. If you don't have a culinary torch, you can briefly place the cake under a broiler, keeping a very close eye on it to prevent burning.
Assembling Your Masterpiece: A Symphony of Flavors
With all three components – the `fluffy orange chiffon cake` layers, the `zesty orange filling`, and the ethereal meringue – prepared, it’s time to bring this love-story-inspired dessert to life.
Layering with Precision
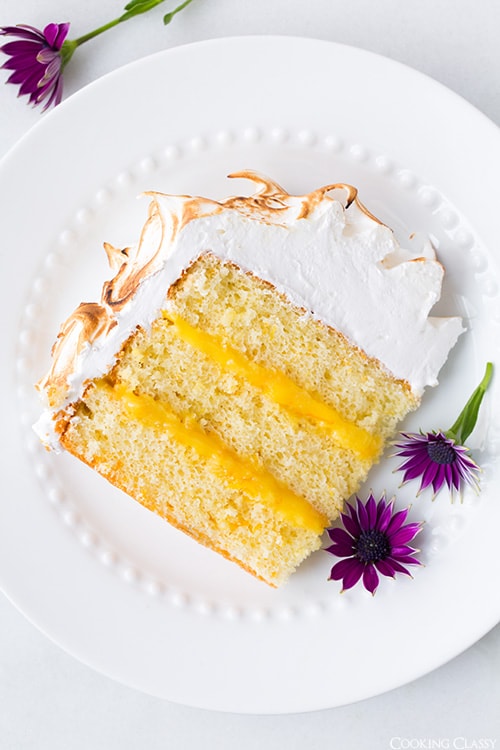
First, gently trim the tops of each cooled cake layer to create perfectly even surfaces. This ensures your final cake will be level and beautiful. Place your first cake layer on your serving plate or cake stand. Spread half of the chilled orange filling evenly over this layer, being sure to leave about a ½-inch rim of cake uncoated around the edge. This small detail helps to prevent the filling from oozing out when you add the next layer.
Carefully place the second cake layer on top, gently pressing it down. Spread the remaining half of the orange filling over this layer, again leaving that crucial ½-inch rim. Finally, top with the last cake layer.
Now, it’s time for the grand finale: spread the glorious Swiss meringue over the entire cake, covering the top and sides in a cloud of sweet perfection. Once assembled, this cake truly stands as
The Ultimate Orange Chiffon Cake: Layers of Citrus Perfection. Use your culinary torch to toast the meringue to a beautiful golden-brown, adding depth of flavor and a visually stunning finish.
This `orange chiffon cake orange filling meringue` is more than just a recipe; it’s an invitation to celebrate love, both eternal and everyday. Inspired by Evan and Bethel's 71-year journey, each layer of this cake is a testament to dedication and the sweet rewards of time. Whether you're commemorating a special occasion or simply want to bake something extraordinary for your loved ones, this recipe promises to deliver a dessert that's as memorable and heartwarming as the story behind it. Enjoy the process, savor the flavors, and share the love – one slice at a time.